
MAKE YOUR OWN WISHING WALL
Welcome!
You must be here because you received one of our Wishing Wall Starter Kits! Here, we provide you with instructions on how to get started making your own origami crane garlands.
This activity was inspired by our Community Grieving Space, which is open to all who visit the shop. We created our first Wishing Wall in May 2022 in an effort to offer a safe space for our community to rest and process their feelings. Visitors were encouraged to take a moment to write down anything they wanted to release on paper and attach it to the garlands. Having a collection of community wishes, feelings, hopes, and grief allows us all to connect, and through sharing our emotions, we know we are not alone. We encourage you to do the same by making a Wishing Wall of your own. It all starts with one garland!


MATERIALS

Your Starter Kit includes:
• 5 sheets of origami paper
• 1 piece of twine
• 6 mini pom poms
• 5 fun beads
• 2 mini clips
Not included but required:
• A needle for threading everything onto the twine
• • • • • • • • • • • •
HOW TO MAKE A PAPER CRANE
Step-by-step instructions to make paper cranes for your garland
*Before beginning, you may want to write down a wish or thought onto the plain side of the paper before folding the crane. This is optional.
1. Using a sheet of origami paper that is facing design-side-up, fold in half on the diagonal both ways, then unfold.
2. Flip paper and fold in half both ways, then unfold.
3. Using the creases you’ve created as guidelines, bring the top 3 corners of the model down to the bottom corner, then flatten the model.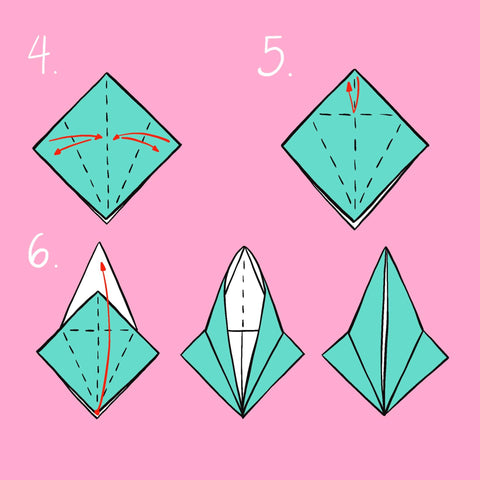
4. Fold the side flaps into the center (like a kite), then unfold.
5. Fold the top of the model downwards, then unfold.
6. This part gets a little tricky: lift the uppermost flap of the model. As you lift and flatten this flap, let the sides fold in and meet at the center. *You have already created guidelines, so these should help the sides fall into place!
7. Turn the model over and repeat steps 4-6 on the other side.
8. Fold the side flaps into the center (like a kite again), then unfold.
9. Repeat step 8 on the other side.
10. Fold both “legs” of the model up, then unfold.
11. Now fold the legs up, but this time, following the creases you’ve just created. This is called an Inside Reverse Fold.
12. Fold down the wings and the little head! You can decide which end you want to be the tail and which end you want to be the head.
Your crane is complete! Repeat with remaining origami paper.
• • • • • • • • • • • •
ASSEMBLING THE GARLAND
Once you’ve folded the cranes…
1. Thread the twine through the needle. Be sure to double-knot the end so the pieces don’t slide off as you add them to the garland.
2. Start by pushing the needle through one of the mini pom poms. Pom poms make great “book ends” so that once you’ve threaded on the crane, the pom pom will stop it from sliding down the twine.
3. Next, thread a crane onto the twine by going through the center of the body. Make sure the needle comes out the top where there is a point. Thread on another pom pom and additional beads as you please.
4. Continue this process until you have threaded all the cranes, poms, and decorative beads onto the twine. Leave some space in between each crane.
5. Once everything is threaded onto the twine, make a little loop at the top before tying it off. That way, you can hang your garland!
6. Now that your garland is complete, you can write your own little notes and clip them onto it with the provided mini clips! We always encourage writing your thoughts, emotions, and ideas 🙂
We hope you have fun!
• Wishing Wall Design & Illustrations by Ana Krent. Find her work for sale here.